Zesty Black Bean Soup (A Cozy, Nourishing Weeknight Meal)

Some dinners don’t need much explaining. They’re the kind you make when the fridge looks sparse, the day ran long, and everyone just needs something warm in their bowl. This zesty black bean soup is one of those steady, reliable meals — built from pantry staples, made in one pot, and ready without much fuss. I come back to recipes like this again and again, especially in seasons when life feels full. A diced onion. A few vegetables softened in olive oil. Beans simmering quietly while the house settles down for the evening. It’s humble food, but it’s deeply nourishing. What I love most is how forgiving it is. You don’t need perfect knife skills or a long stretch of uninterrupted time. Just a pot on the stove, a wooden spoon, and the willingness to slow down for a few minutes while dinner comes together. This soup is cozy without being heavy, flavorful without being complicated, and endlessly adaptable depending on what you have on hand. It’s the kind of meal that reminds me: simple can still be really, really good. Ingredients You’ll Need Before you begin, gather everything on the counter. There’s something calming about seeing it all laid out — like the meal is already halfway made. Optional toppings: Fresh cilantro, diced red onion, sliced avocado, sour cream, extra lime wedges How to Make This Zesty Black Bean Soup This soup comes together gently, step by step. Let each stage do its quiet work — the flavor builds naturally as you go. 1. Soften the Vegetables Heat the olive oil in a large pot over medium-high heat. Add the diced red onion, carrot, and celery. Stir to coat everything in the oil, then let the vegetables cook for about 8 minutes, stirring occasionally, until softened and the onion is translucent. This is your flavor base. Let it take its time. 2. Add the Garlic and Spices Stir in the minced garlic, cumin, oregano, coriander, and kosher salt. Cook for about 1 minute, just until fragrant. Be careful not to rush this step or let the garlic brown. 3. Simmer the Soup Add the drained black beans and chicken broth to the pot. Stir and bring everything to a gentle boil. Once boiling, reduce the heat to low, cover, and let the soup simmer for 15 minutes. This gives the flavors time to come together. 4. Blend to Your Liking Using an immersion blender, blend the soup directly in the pot a few times. Aim for a mix of textures — creamy, but still chunky. Blend longer for a smoother soup, or just a few pulses for a rustic finish. Stir in 1 to 2 tablespoons of fresh lime juice, tasting as you go. The lime adds brightness and brings the whole pot to life. 5. Serve Ladle the soup into bowls and top with whatever you love most — cilantro, avocado, sour cream, or red onion. Serve warm, with extra lime wedges on the side. Serving Notes & Variations This soup reheats beautifully and makes excellent leftovers. A Gentle Closing Thought There’s something quietly reassuring about knowing you can make a good meal from what you already have. This zesty black bean soup isn’t fancy. It doesn’t try to impress. It simply nourishes — body and spirit both — and sometimes that’s exactly what our homes need. If this recipe brought a bit of warmth to your table, I’d love for you to subscribe to my email newsletter so you don’t miss future recipes. Or share this one with a friend who could use an easy, comforting dinner this week. You’re doing enough. And this? This is good food.
One-Pot Lemon Chicken and Orzo (A Cozy Dutch Oven Dinner)
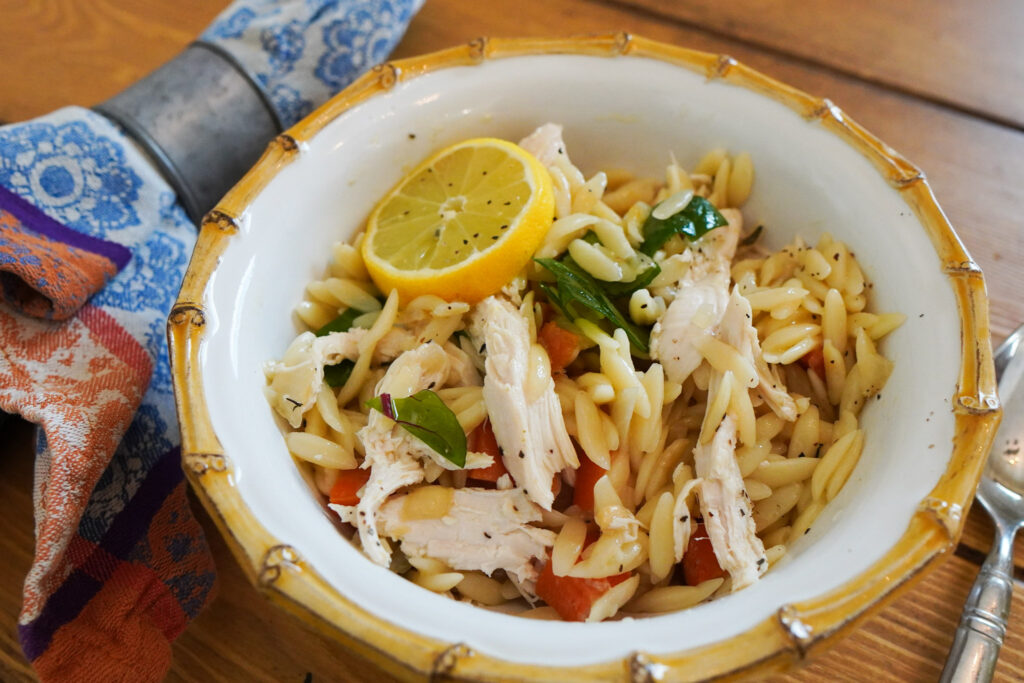
There are some meals that don’t just feed your people — they settle the house. The kind that fills the kitchen with warmth and citrus and herbs, where the windows fog up a little and no one asks what’s for dinner because they already know. This lemon chicken and orzo is that kind of meal. It’s steady. Unfussy. Made in one big pot that asks very little of you except presence. I love recipes like this in the quieter seasons of motherhood — when the days are full, the to-do list is long, and dinner needs to feel like a soft landing instead of another task. This is the meal I make when I want everyone to eat well without juggling three pans or hovering over the stove. It starts with a whole chicken, browned until golden, nestled into a broth brightened with lemon and herbs. The orzo cooks right there in the pot, soaking up all that goodness while the chicken becomes tender enough to pull apart with a spoon. By the time it comes out of the oven, it’s not just dinner — it’s comfort, waiting patiently. If your heart craves simple food made slowly, this one’s for you. Why This Recipe Works So Well What I love most about this dish is how gentle it is. There’s no rushing. No complicated timing. Everything happens in one Dutch oven — first on the stovetop, then tucked into the oven where it can do its quiet work while you tend to other things. The lemon keeps the broth light and bright, the herbs add warmth without overpowering, and the orzo turns the whole thing into a meal that feels complete. It’s hearty without being heavy. Comforting without being dull. And because the chicken roasts right in the broth, it stays beautifully tender — perfect for slicing at the table or shredding for younger children. A Few Helpful Notes Before You Begin Ingredients You’ll Need Here’s everything you’ll want to have ready before you begin. I find that pulling it all out ahead of time makes the cooking feel calmer — like we’re setting the table before the guests arrive. How to Make This Lemon Chicken and Orzo This recipe moves at a gentle pace. Don’t rush it — each step builds the flavor in a quiet, important way. 1. Preheat and Prepare Your Pot Preheat your oven to 350°F. Choose a large, heavy-bottomed Dutch oven — about 7 quarts or larger — that’s safe for both stovetop and oven use. This single pot will hold the entire meal, which means fewer dishes and a calmer kitchen at the end of the day. 2. Brown the Chicken Heat the olive oil in the Dutch oven over medium-high heat. Season the whole chicken generously with the sea salt. Once the oil is hot, carefully place the chicken breast-side down into the pot. Let it cook undisturbed for about 3 to 4 minutes, until the skin is golden and releases easily from the bottom. Turn the chicken over and cook for another 3 minutes. This quick browning adds so much depth to the finished dish — it’s worth those extra few minutes. Remove the chicken from the pot and set it aside on a plate. 3. Sauté the Vegetables and Herbs With the heat still on medium, add the carrots and leeks to the pot. Stir them gently, scraping up any browned bits left from the chicken — that’s where the flavor lives. Sprinkle in the dried oregano and thyme, letting the herbs bloom in the warm oil. After the vegetables have softened slightly, add the minced garlic and cook for about 30 seconds, just until fragrant. Garlic is tender like that — it only needs a moment. 4. Return the Chicken and Add the Broth Nestle the chicken back into the pot, moving the vegetables to the sides so the chicken sits comfortably in the center. Pour in the chicken broth and the juice of two lemons. You want enough liquid to come about ¾ of the way up the chicken, but not completely cover it — especially the breast. This allows the chicken to roast gently instead of boiling. Increase the heat and bring everything to a gentle boil. 5. Roast in the Oven Once boiling, carefully cover the pot with its lid and transfer it to the oven. Roast for 1 hour and 15 minutes. During this time, the chicken becomes tender, and the broth takes on all those beautiful flavors. 6. Add the Orzo Remove the pot from the oven and carefully lift the lid — watch for steam. Stir in the orzo, making sure it’s fully submerged in the broth. This is where the dish begins to feel especially cozy, as the pasta absorbs the lemony, herbed broth. Cover the pot again and return it to the oven for 30 more minutes. 7. Rest Before Serving Once finished, take the pot out of the oven, remove the lid, and gently stir the orzo. Let everything rest for about 15 minutes. This allows the orzo to finish absorbing the broth and gives the flavors time to settle. Sprinkle generously with chopped flat-leaf parsley just before serving. Serving Notes for Real Life This is one of those meals that invites everyone to gather around the pot. I like to bring it straight to the table with a big spoon and a knife, letting everyone cut the chicken they want. For little ones, I’ll often remove the chicken, shred it into bite-sized pieces, and stir it back into the orzo so everything is easy and comforting. A simple green salad or a loaf of crusty bread is plenty on the side. This dish doesn’t need much — it already carries the meal. Leftovers reheat beautifully and make a lovely lunch the next day. Variations & Gentle Substitutions A Quiet Closing Thought There’s something deeply reassuring about a meal that asks you to slow down. This lemon chicken and orzo
Winter Salad with Cranberries, Feta, Walnuts & Balsamic Dressing
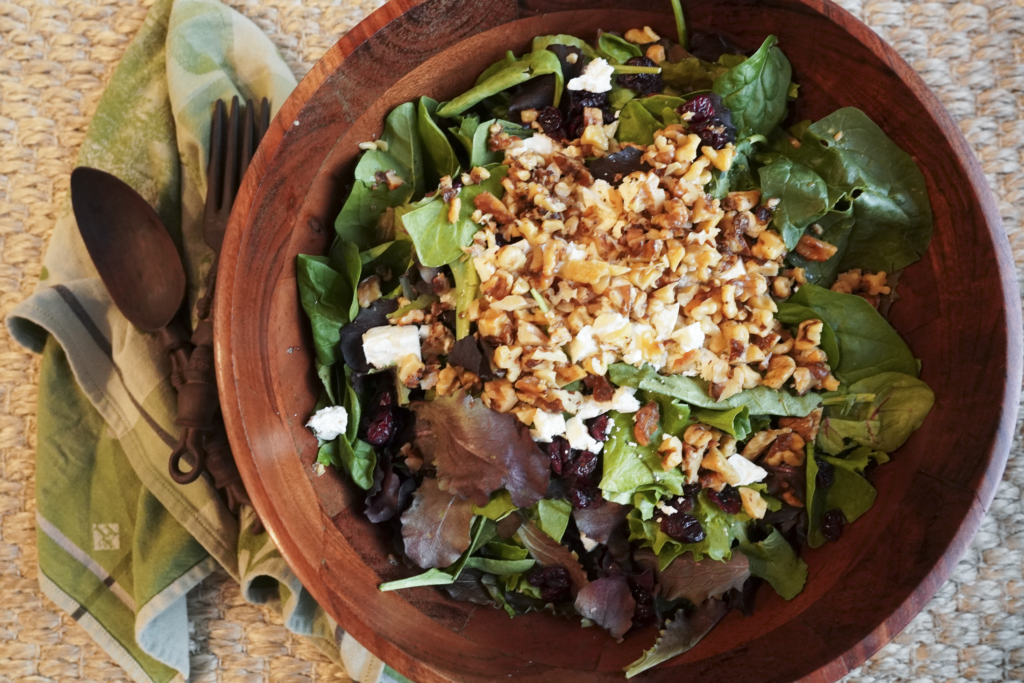
Fresh, Elegant, & Easy Winter salads can feel just as cozy and satisfying as a warm meal. Crisp greens, sweet-tart cranberries, nutty walnuts, creamy feta, and a simple homemade balsamic dressing come together to create a salad that is fresh, elegant, and approachable. Each bite balances sweet, salty, tangy, and crunchy flavors in a way that feels intentional yet effortless. This salad works beautifully for holiday meals, weeknight dinners, or a vibrant side for a casual lunch. It’s the kind of recipe that can brighten the table without stealing the spotlight from your main course, yet still feels special and seasonal. Why I Love This Salad There’s something about a well-composed salad that makes it feel alive. The colors, textures, and aromas all play together: the ruby-red cranberries, the soft white feta, the deep brown crunch of toasted walnuts, and the glossy shine of greens tossed in a tangy balsamic dressing. It’s a simple reminder that fresh ingredients, treated thoughtfully, can transform an ordinary meal into something memorable. I first started making this salad a few winters ago when I wanted something bright and fresh to complement heavier seasonal dishes. Over time, I’ve refined it to balance flavors, textures, and make the dressing just right — tangy, slightly sweet, and creamy enough to coat the leaves without overpowering them. Ingredients That Shine in Winter Each ingredient has a role, and when combined thoughtfully, the salad feels seasonal, elevated, and intentional. Homemade Balsamlic Dressing This dressing is light, flavorful, and easy to make. It’s what makes the salad come alive. Ingredients: Instructions: This dressing is versatile and forgiving. It clings to the greens without weighing them down and can be adjusted depending on your preference for sweetness or tang. Helpful Tips & Tricks Toast Your Walnuts Balance Flavors Prep Ahead Make It a Meal Variations to Try Experimenting keeps the salad feeling fresh and seasonal, and it’s a wonderful way to use what you have on hand. Serving & Storing Why This Salad Works This salad feels seasonal, intentional, and elegant. Every texture, flavor, and color works together. Sweet cranberries, crunchy walnuts, creamy feta, and tangy dressing create a winter salad you’ll make again and again. It’s simple yet special, quick yet refined. The kind of dish that reminds you fresh, thoughtful food doesn’t need to be complicated. Reflection I often think about the little details when I make a salad like this: how the light hits the kitchen in winter, how the crunch of toasted walnuts sounds, and the smell of balsamic vinegar mingling with olive oil. Simple pleasures like these remind me why I cook and create meals with intention.It’s a salad that invites mindfulness. Taking the time to toast nuts, finely mince shallots, or drizzle dressing slowly becomes part of a ritual of care — for yourself, your family, and your table.
Creamy Mashed Potatoes (Easy, Classic, Foolproof)

A Simple, Reliable, Expert Method Mashed potatoes don’t need to be complicated to be exceptional. With the right technique, they become smooth, creamy, and richly flavored — the kind you can serve with confidence at any meal. My grandmother taught me early on that the two things you never skip are butter and salt. Those two ingredients carry the whole dish. Her method was simple, and over time I refined it into a version that is both classic and consistent. This recipe serves 6–8 people and follows steps that always work: start the potatoes in cold water, dry them after draining, warm the dairy, and mash gently. These small details create a noticeable difference in texture and flavor. Why This Recipe Works Every Time Potatoes might seem simple, but there’s an art to turning them into something special. The key is respecting each ingredient and giving it what it needs. Follow these steps, and you’ll have a mash that feels both humble and luxurious at the same time. Helpful Notes & Tips Use the Right Potatoes Salt Is Essential Salt isn’t optional. Season the water, then taste and adjust at the end. Potatoes need more salt than most people expect to taste balanced. Warm Your Dairy Cold butter and cream shock the potatoes and make them slightly grainy. Warm them for a smooth, creamy finish. Mash Gently Use a hand masher for a rustic texture or a hand mixer on low for a smoother finish. Avoid immersion blenders — they overwork the potatoes. Ingredient Breakdown Optional add-ins: roasted garlic, fresh chives, cream cheese, or grated Parmesan. Troubleshooting Potatoes too watery? Drain well and return to warm pot for a minute before adding dairy. Potatoes gluey? You likely overworked them — mash gently. Flavor flat? Adjust salt. Butter, cream, and salt are your friends. Taste as you go. Serving Ideas Mashed potatoes pair beautifully with: You can also serve them topped with sautéed mushrooms, caramelized onions, or fresh herbs for an elevated touch. Make-Ahead & Storage Reflection Simple food can be deeply satisfying when made with intention. These mashed potatoes follow a method that’s steady and dependable — the kind passed down from cooks who understood the value of doing the basics well. I remember serving this mash at family dinners, watching everyone go back for seconds. The smell of butter, the creaminess of the potatoes, and the satisfaction of knowing every bite was made with care… that’s what makes a simple dish feel extraordinary. If this recipe becomes part of your table, I’d love for you to subscribe to my newsletter so you never miss the next recipe. And if someone in your life loves classic homemade dishes, feel free to share this post with a friend.
Butternut Squash Soup

A simple, deeply comforting bowl for fall and winter Nothing says fall and winter more than butternut squash simmering gently on the stove. There’s something about the warmth, the earthiness, the softness of it — as if this humble vegetable was made for the colder months. And when you pair it with savory Italian sausage? It becomes a bowl that feels both deeply nourishing and beautifully simple. This recipe is butternut squash soup in its most basic and unfussy form. A handful of ingredients, a single pot, and nothing extra that might take away from the quiet goodness of squash, rosemary, and garlic. It’s the kind of recipe you make on a slow evening, when the house starts to dim and you want something warm that doesn’t ask much of you. In our home, we ladle the creamy soup into bowls and top each one with cooked Italian sausage. It’s such an easy way to add protein and make the meal feel a little heartier — especially when feeding growing little ones who always seem to be hungry again before the dishes are done. But you can use your creative freedom here: pumpkin seeds, a swirl of sour cream, fresh herbs, or just the soup by itself. It’s lovely in every form. This is the kind of dinner that brings everyone together — simple, warm, and grounding. The kind of meal that fills the house with the smell of onions, rosemary, and comfort. And somehow, it never fails to make the evening feel a little softer. Why You’ll Love This Butternut Squash Soup It uses simple, real ingredients Just squash, onions, garlic, broth, and warm spices. Nothing complicated. Naturally creamy No cream needed — the squash does all the work. Cozy and wholesome Warm spices like rosemary and ginger bring depth without overpowering. Protein-friendly Top each bowl with Italian sausage for a satisfying, full meal. Perfect for meal prep It reheats beautifully and tastes even better the next day. Ingredients Optional Toppings Instructions 1. Cook the Onion & Squash Heat olive oil in a large pot.Add onion, squash, and salt. Cook about 8 minutes, letting everything soften and just begin to brown. 2. Add Aromatics Stir in garlic, rosemary, and ginger. Cook 30 seconds until fragrant. 3. Add Broth & Simmer Pour in the broth. Bring to a boil, then cover and reduce to a gentle simmer. 4. Blend Until Smooth Let the soup cool slightly, then blend until silky smooth.If the soup is too thick, add more broth to reach your preferred consistency. 5. Garnish & Serve Ladle into bowls and top with: Tips & Variations Closing Reflection There’s such a gentle beauty in a pot of soup simmering on the stove — especially one as simple and welcoming as this Butternut Squash Soup with Sausage. It’s nourishing without being complicated, warm without being heavy, and comforting in all the ways fall and winter seem to ask for. If you make this recipe, I hope it brings a little peace into your evening.And if you’d like more simple, seasonal recipes like this one, I’d love for you to subscribe to my newsletter — or share this recipe with a friend who could use a warm bowl tonight.
Crispy Feta Potatoes
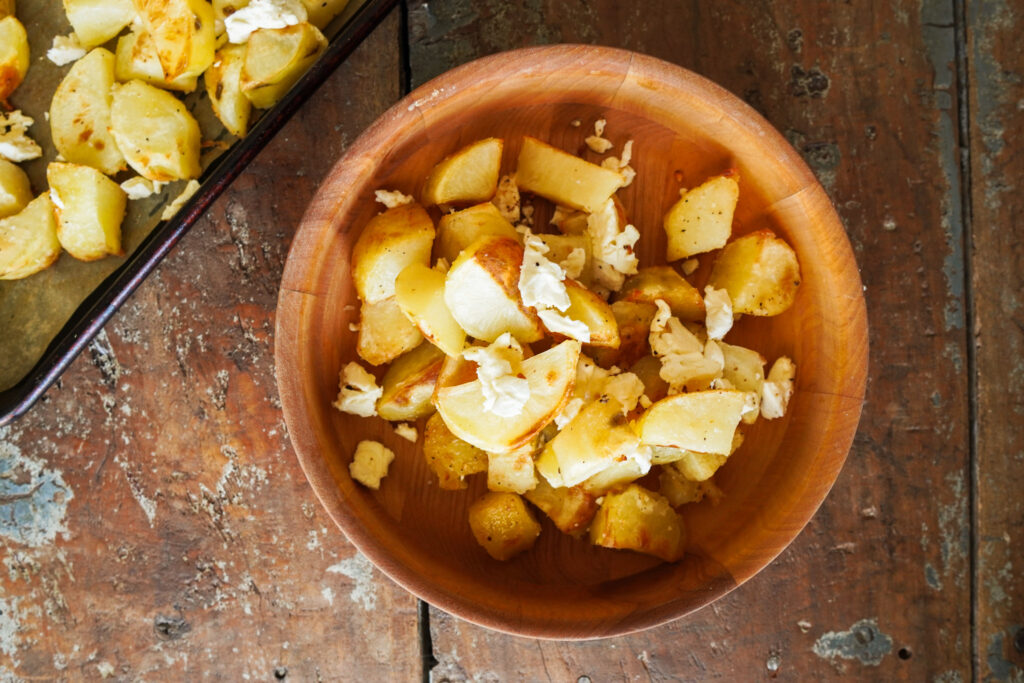
A simple, show-stopping side that’s crispy, salty, sweet, and unforgettable Every now and then, a potato recipe comes along that steals the entire meal. These Crispy Feta Potatoes are exactly that — golden and crisp on the outside, soft on the inside, tossed with warm honey and plenty of salty feta. They’re simple, hearty, and the kind of dish people pause to ask about mid-bite. I first made them on a night when dinner needed to be quick but still satisfying. The moment I pulled them from the oven — honey bubbling, feta softening, edges crisping — I knew they were something special. Now they make their way onto our table for Sunday dinners, birthday gatherings, and the everyday meals when I just want something easy and delicious. And here’s the best part: these potatoes love generous seasoning. Don’t hold back on the feta. Be warm and bold with the honey. Salt and pepper with confidence. When everything comes together, it’s the kind of side dish that feels abundant and joy-filled — even though it took almost no effort at all. Why These Potatoes Shine Perfectly crispy edges A quick boil before roasting gives you that magical crisp-outside, soft-inside texture. Feta + honey = irresistible The salty creaminess of feta and warm sweetness of honey create the most harmonious contrast. Family-friendly flavors Sweet, salty, and garlicky — even picky eaters gravitate toward these. No-fuss ingredients Just potatoes, olive oil, seasonings, honey, and feta. They pair with everything Chicken, steak, salmon, salads, or a simple roasted veggie night. Ingredients (6–8 servings) Instructions 1. Boil the Potatoes Place potatoes in a pot and cover with water.Bring to a gentle boil and cook about 8 minutes, just until tender.Drain and let them steam dry for 2–3 minutes — this helps them crisp beautifully. 2. Preheat the Oven Set oven to 425°F (220°C).Grease or line a baking sheet. 3. Season the Potatoes In a large bowl, toss potatoes with olive oil, garlic powder, onion powder, salt, and pepper.Make sure every piece is well-coated. 4. Roast Spread potatoes onto the baking sheet in an even layer.Roast 20–25 minutes, flipping halfway, until deep golden and crispy. 5. Add the Honey & Feta Remove from the oven.Sprinkle generously with feta and drizzle with honey.Return to the oven for 5–10 minutes, just until the feta softens. 6. Serve Toss gently, taste, and adjust seasoning.These are meant to be bold, flavorful, and fully enjoyed. Notes Closing Reflection There’s such comfort in a dish that feels simple but tastes extraordinary — the kind of food that brings people closer to the table and makes dinner feel special without any extra work. These Crispy Feta Potatoes have become one of those recipes in our home, and I hope they find a place in yours too. If you enjoyed this recipe, I’d love for you to subscribe to my newsletter — or share it with a friend who needs a new, crowd-loving side dish.
Apple Cider Spice Cake

A warmly spiced fall bundt cake that tastes like a slow afternoon. There’s a moment every autumn when I find myself craving the kind of dessert that invites you to pause — just long enough to breathe in the season. For me, that moment almost always leads to this Apple Cider Spice Cake. It’s soft and tender, scented with cinnamon and ginger, and full of that gentle apple-cider sweetness that feels like comfort in cake form. This cake began as something I wanted to bake for a quiet afternoon tea, but instantly became a family favorite. I love that it uses simple, everyday ingredients yet tastes like something you’d serve proudly to friends. The warm spices bloom beautifully as it bakes, filling your home with a fragrance I can only describe as pure fall. And because it’s a bundt cake, it presents itself so effortlessly — no frosting, no fuss. Just a dusting of powdered sugar and a cup of tea beside it. If you’re looking for a fall bundt cake that feels homemade, peaceful, and deeply satisfying, this is the one I reach for again and again. Why You’ll Love This Apple Cider Spice Cake Ingredients Dry Ingredients Wet Ingredients Step-by-Step Instructions 1. Preheat & Prepare Preheat your oven to 350°F. Generously grease a bundt pan — every ridge and curve — to help your apple cider bundt cake release cleanly later. 2. Mix the Dry Ingredients In a medium bowl, whisk together the flour, baking powder, cinnamon, nutmeg, ginger, cloves, and salt. 3. Cream Butter & Sugars Using a hand mixer, beat the softened butter with the granulated sugar and brown sugar until the mixture is light and fluffy — about 2–3 minutes. 4. Add the Wet Ingredients Mix in the Greek yogurt, applesauce, apple cider, and vanilla. The batter may look a little uneven, and that’s perfectly fine. 5. Combine Wet & Dry Pour the dry mixture into the wet mixture and mix on low until just combined. Gentle mixing keeps the crumb soft. 6. Bake Transfer the batter into your prepared bundt pan and smooth the top. Bake for 50–55 minutes, or until a toothpick comes out clean. 7. Cool & Release Allow the cake to cool for at least 30 minutes before flipping. A little patience here ensures your apple cider spice cake releases beautifully. Dust with powdered sugar if you’d like — sometimes the simplest finish is the most charming. Helpful Notes How to Store FAQ Can I make this apple cider spice cake ahead of time? Yes — it actually tastes even better the next day as the spices deepen. Bake it, cool completely, and store tightly wrapped. Can I use apple juice instead of apple cider? You can, but apple cider gives richer, more concentrated fall flavor. If you use apple juice, consider adding an extra pinch of cinnamon. Can I bake this in a loaf pan instead of a bundt pan? Absolutely. Divide the batter into two loaf pans and bake 45–55 minutes. Check early for doneness. Closing Reflection There’s a quiet kind of magic in a simple spiced cake — one you can bake on a Saturday morning or serve after dinner with warm mugs passed around the table. This Apple Cider Spice Cake is one of those recipes that gathers people, slows the day a bit, and reminds you of the gentle beauty tucked into each season. If this recipe made your home smell warm and welcoming today, I’d be honored if you subscribed to my newsletter — so we can keep baking together, one simple, wholesome recipe at a time.And if you have a friend who loves spice cakes, feel free to share it with her too.
A Cozy Skillet of Creamy Tuscan Chicken

There’s something about creamy, sun-dried tomato sauce that feels like a warm hug after a long day. This Creamy Tuscan Chicken — made perfectly kid-friendly — has all that cozy, restaurant-level flavor: tender bites of chicken, ribbons of spinach, and a silky Parmesan cream sauce. Yet it’s simple enough to pull together while the kids set the table or finish homework at the counter. I first made it on a weeknight that had gone completely sideways — math worksheets on the counter, muddy shoes by the door, and a toddler insisting on “helping” with dinner. But as the garlic hit the pan and the cream began to simmer, the kitchen transformed. It smelled like something worth slowing down for. That’s the gift of this recipe: it brings the comfort of an Italian restaurant meal right to your own busy kitchen, no reservations or babysitters required. And because the sauce is rich and plentiful, there’s always enough to spoon generously over pasta or rice — or to dip with a warm hunk of bread, because that sauce is the real magic. Ingredients This recipe serves 4–6 people — and every drop of that creamy sauce will be loved. Step-by-Step: How to Make Creamy Tuscan Chicken 1. Prep the Chicken Cut the chicken into bite-sized cubes and pat dry with paper towels. Season with a pinch of salt and pepper. 2. Brown the Chicken Heat the olive oil in a large skillet over medium-high heat. When the oil shimmers, add half the chicken in a single layer — don’t crowd the pan. Let it cook undisturbed for 3–4 minutes, then flip and cook another 2–3 minutes until golden. Remove the cooked chicken from the skillet and set aside on a plate. Repeat with the remaining chicken, adding a touch more oil if needed. Once all the chicken is browned, set it aside while you build the sauce. This keeps it juicy and lets the pan drippings flavor the next step beautifully. 3. Create the Flavor Base Lower the heat to medium. In the same pan, add the minced garlic and chopped sun-dried tomatoes. Stir for about a minute, just until fragrant — this is where the magic begins. Those browned bits on the bottom of the pan will lift and flavor the sauce beautifully. 4. Build the Sauce Pour in the chicken broth, scraping up all that flavor from the bottom of the pan. Let it simmer for 2–3 minutes to reduce slightly. Stir in the heavy cream and bring it to a gentle simmer. The sauce should be thick enough to coat a spoon but still pourable. 5. Add Cheese and Greens Whisk in the Parmesan cheese until melted and smooth. Taste and season with salt, pepper, and herbs. Stir in the spinach and cook until just wilted, about 1 minute. 6. Combine and Finish Return the chicken (and any juices) to the skillet. Toss gently to coat in the creamy sauce and let it simmer on low for another 2–3 minutes so the flavors meld together. Serve it hot over your favorite pasta, fluffy rice, or with warm crusty bread. The sauce is rich and garlicky — perfect for dipping. Helpful Notes & Variations Getting Perfectly Cooked Chicken Even pieces cook evenly. Cutting the chicken into uniform 1-inch cubes helps everything cook through without drying out. Cooking in batches ensures each bite browns nicely instead of steaming. Ensuring the Sauce Serves Enough The ratio of 1 cup cream to 1½ cups broth yields just over 3 cups of sauce — plenty to coat everything and leave a little extra for spooning over sides. If your family loves things extra saucy, increase to 1¼ cups cream and ¾ cup Parmesan. Ingredient Tips Make-Ahead, Storage & Reheating Tips Kids in the Kitchen This is one of those meals that invites little helpers.Younger kids can sprinkle cheese or stir in the spinach. Older ones can measure broth or whisk the sauce. It’s a small act of inclusion that turns dinner into connection — and somehow, they always eat better when they’ve helped make it. Serving Ideas Serve this Creamy Tuscan Chicken over: If you’re feeding a crowd, double the recipe and serve right from the skillet — it’s rustic, beautiful, and feels effortlessly welcoming. Closing Reflection There’s something sacred about a weeknight meal that draws everyone to the table — even if there’s homework scattered beside the plates and someone’s still in soccer cleats. This Creamy Tuscan Chicken is more than an easy dinner. It’s a small act of care, a warm meal shared in the middle of real life. Creamy sauce, tender chicken, laughter — that’s the kind of abundance that doesn’t need to be fancy to be beautiful. If this recipe brought a little comfort to your evening, I’d love for you to subscribe to my email newsletter so you never miss a simple, family-centered recipe — or share it with a friend who could use an easy dinner win tonight.
Easy Blender Pumpkin Muffins

Every fall, without fail, we make pumpkin muffins — and every fall, we end up with that half can of pumpkin puree sitting in the fridge, forgotten. You know the one. This recipe was born out of a simple thought: what if we used the whole can? It turns out, that’s exactly what pumpkin muffins needed. Using the full can makes the batter perfectly moist and rich without being heavy, and it adds that deep, warm flavor that makes your kitchen smell like October. These muffins are gluten-free, made with ground oats instead of flour. They’re hearty and naturally sweet — a wholesome breakfast or snack that doesn’t feel like a compromise. The texture is soft and tender, the flavor perfectly spiced, and the ingredient list refreshingly simple. And if you’re like me, you’ll appreciate how easy they are to make. One bowl for dry, one for wet, a quick mix, and they’re ready for the oven. I usually bake them on a Sunday afternoon so we can have them ready for busy school mornings — but honestly, they’re just as good with coffee on a quiet afternoon. Why You’ll Love This Recipe Ingredients You’ll need: This recipe makes about 18–20 muffins — enough to share or freeze for later. Instructions: How to Make Gluten-Free Pumpkin Muffins Step 1: Preheat the Oven Set your oven to 350°F (175°C). Lightly grease your muffin tin or line with paper liners. Step 2: Mix the Dry Ingredients In a large bowl, whisk together the ground oats, baking soda, baking powder, salt, cinnamon, and pumpkin pie spice. If you’ve never made oat flour before, don’t worry — it’s easy. Just blend rolled oats in your blender until they resemble fine flour. Step 3: Mix the Wet Ingredients In a separate bowl, whisk together the cane sugar, vanilla extract, pumpkin puree, eggs, and melted coconut oil. Make sure your coconut oil is warm but not hot — you don’t want it to cook the eggs. Step 4: Combine Wet and Dry Pour the wet ingredients into the dry ingredients. Stir until just combined. The batter will be thick but smooth and glossy. If you’re using chocolate chips, fold them in at the end. Step 5: Fill and Bake Scoop the batter into your prepared muffin tins, filling each about ¾ full. Bake for 25–30 minutes, checking around the 25-minute mark. A toothpick should come out mostly clean — a little moisture is good here; that’s what keeps them soft. Step 6: Cool and Enjoy Let the muffins cool in the pan for 5–10 minutes before transferring to a wire rack. They’re wonderful warm from the oven, with butter or a drizzle of honey, but they also store beautifully for the week. Helpful Notes Flavor Variations Why This Recipe Works The oat flour gives these muffins a hearty, wholesome texture — not dense, but satisfying. The coconut oil and pumpkin keep them incredibly moist, and the warm spices give that classic pumpkin muffin flavor without needing anything extra. They’re the kind of muffins that make your kitchen smell like home. The kind that somehow taste even better the next morning with coffee. And most importantly — they’re simple. Just mix, pour, and bake. No complicated steps, no leftover pumpkin, and no stress. Closing Reflection: Fall in a Muffin Tin Sometimes, slowing down looks like baking something small. Something that fills the house with cinnamon and warmth while the world outside gets chilly. These pumpkin muffins remind me that the best kind of baking isn’t about perfection — it’s about presence. It’s about measuring by feel, stirring slowly, and taking a deep breath while they rise in the oven. If you make them, I hope they bring that same kind of peace to your kitchen — the quiet joy of feeding your family something wholesome and homemade. And if this recipe made you smile, I’d love for you to subscribe to my newsletter so we can keep baking together — simple, beautiful recipes that make every season feel a little slower and sweeter.
Pineapple Gut-Healing Gummies

There’s a quiet joy in recipes that make nourishment feel effortless. These Pineapple Gut-Healing Gummies are one of those treasures — simple to make, genuinely healthy, and loved by everyone in the house (even the picky ones). I first started making them as a way to sneak a little extra protein and gut support into my children’s snacks. Between growing bodies and busy days, I wanted something that felt like a treat but actually strengthened their little systems from the inside out. And honestly? It’s one of my favorite snacks too. They’re lightly sweet, chewy, and taste like a burst of sunshine. The best part — they take maybe ten minutes of hands-on time, and the fridge does the rest. Why You’ll Love These Gummies These gummies aren’t candy — they’re real food. Gentle on digestion, easy to digest protein, and nourishing for joints, skin, and the gut lining. Ingredients That’s it — just two ingredients. Real food at its simplest. Step-by-Step: How to Make Pineapple Gut-Healing Gummies 1. Bloom the Gelatin Pour the entire jar of pineapple juice into a large saucepan — no heat yet. Sprinkle 4 scoops of beef gelatin evenly across the surface of the juice. Then, walk away for five minutes.During this time, the gelatin will start to bloom — it will look wobbly and uneven, almost like soft clouds forming across the juice. That’s exactly what you want. (My kids always love watching this part — it’s kitchen science at its friendliest.) 2. Melt and Combine After 5 minutes, turn the heat to medium-low and gently warm the mixture, stirring often until all the gelatin has dissolved. You don’t want to boil it — just heat it enough that everything becomes smooth and liquid again. Once it’s clear and no bits remain, remove from heat. 3. Pour and Chill Carefully pour the mixture into a glass dish or container (an 8×8 or 9×9 pan works well). Set it on a level surface in your refrigerator and let it firm up for 3–4 hours. 4. Slice and Serve Once set, use a sharp knife to cut the gummies into bite-sized squares. Store them in an airtight container in the fridge for up to a week. They’re cool, chewy, and softly sweet — the kind of snack that disappears faster than you expect. Helpful Tips Why These Gummies Are So Nourishing Grass-fed beef gelatin is rich in collagen, amino acids, and minerals that support gut health, skin elasticity, joint function, and recovery. Paired with pineapple — which naturally contains bromelain, an enzyme known for its anti-inflammatory and digestive benefits — these little squares are packed with quiet power. It’s food that heals, not just fills. And because the flavor is light and tropical, no one complains. The kids just ask for “the yellow gummies” and I smile, knowing how much goodness they’re getting with every bite. I linked the Bovine Gelatin I use here: it’s triple party tested, grass-fed, and is the world’s first certified glyphosate residue-free gelatin. To me, that speaks volumnes. How to Store Keep your gummies in the fridge in a covered glass container for up to 7 days.They’re best served cold, especially on warm afternoons or as a post-meal snack. You can also freeze them for longer storage — they’ll thaw perfectly in the fridge overnight. Serving Ideas Closing Reflection Motherhood often feels like balancing nourishment and simplicity — wanting to feed our families well but not spend hours doing it. This little recipe is proof that real nourishment doesn’t have to be complicated. Just two ingredients, five minutes, and a bit of waiting. And in return? You get a snack that supports gut health, strengthens growing bodies, and brings smiles all around. If you make these Pineapple Gut-Healing Gummies, I hope they bring that same small joy to your kitchen — a reminder that feeding your family well can be simple, sweet, and entirely doable. And if this recipe brightened your day, I’d love for you to subscribe to my newsletter so you never miss a wholesome, real-life recipe made with love and purpose.

